A Custom tab (Figure 9.3) is also available for making your own custom calculations just as you would in an Excel spreadsheet. Clicking on the Function F(x) button will provide you with a list of the supported functions you can use in this tab. Other basic mathematical functions are also supported, such as =, +, -, /, *, ^. If you use this optional Custom Calculations tab and wish to link some cells to the input tabs (e.g., Project 1), you can select the cells in the Custom Calculations tab, right-click, and select Link To. Then proceed to the location in the Project tabs and highlight the location of the input cells you wish to link to, right-click, and select Link From. Any subsequent changes you make in the Custom Calculations tab will be updated in the linked input assumption cells.
Example 1: In the Custom Calculations tab, enter the following: 1, 2, 3 into cells A1, B1, C1, respectively. Then in cell D1, enter = A1+B1+C1 and click on any other cell and it will update the cell and return the value 6. Similarly, you type in =SUM(A1:C1) to obtain the same results. The preset functions can be seen by clicking on the f(x) button.
Example 2: In the Custom Calculations tab, enter the following: 1, 2, 3 into cells A1, B1, C1, respectively. Then, select these three cells, right-click, and select Link To. Proceed to any one of the Project tabs, and in the Discounted Cash Flow or Input Assumptions subtabs, select three cells across (e.g., on the Revenue line item), right-click, and select Link From. The values of cells A1, B1, C1 in the Custom Calculations tab will be linked to this location. You can go back to the Custom Calculations tab and change the values in the original three cells and you will see the linked cells in the Discounted Cash Flow or Input Assumptions subtabs change and update to reflect the new values.
TIPS on the Custom Tab
- The Custom tab is where you can replicate your Excel models with multiple worksheets or multiple Excel workbooks so that all the preliminary calculations linked to your project will be stored in one convenient place, ready for auditing and archiving the models.
- In PEAT, click on Help | Extras | PEAT Visual Guide 08 – Custom Tab and Excel Links for a visual guide of these Custom tab’s tips.
- Click on the Custom tab and then right-mouse-click to Add additional tabs, Delete existing tabs, Duplicate, Rename, and Rearrange Custom tabs.
- You can manually move and resize the column widths or click the Grid… button to select Auto Fit or set a specific width size.
- You can click on the FX icon to bring up a list of currently supported functions (e.g., ABS, AVERAGE, CONCAT-ENATE, LEFT, LEN, LN, LOG, LOG10, MAX, MIN, POWER, RIGHT, ROUND, SUM, SUMIF, SUMPROD-UCT, IF, AND, OR, +, -, /, *, ^).
- You can Name Cells (select one or more cells, type in the name you want in the cell Name box on the top left of the data grid and hit Enter). These named cells will appear later in Tornado, Scenario, and Risk Simulation tabs for easier recognition. If more than one cell is selected, then the cells will have the same name followed by an index (e.g., MyName1, MyName2, MyName3, etc.).
- Note that you can have multiple Custom tabs and rename them as you wish; each tab also has an internal name such as xls1, xls2, and so forth. These internal names are used in the software’s internal algorithms as well as when you cross-link cells (linking across different Custom tabs, see below).
- You can copy existing calculations and worksheets from Excel and paste them into the Custom tabs. Simply select the cells or area in the Excel model worksheet you wish to copy, then CTRL+C or right-mouse-click Copy or click on the Copy icon in Excel. Then, select a cell in the Custom worksheet and hit CTRL+V or right-mouse-click Paste to paste into the Custom worksheet. Note that this approach will only paste the Texts and Values. Colors, equations, functions, live calculations, and formatting will not be included.
- Alternatively, you can paste a Live Excel Model with computations into the Custom worksheet:
- In your Excel model, click CTRL~ (hold down the Control key while hitting the tilde ~ key, which is usually located to the top left of the number 1 and letter Q keys) to change the Excel view from values and results to Equation View where you can see all the equations and functions. Once you are in the Equation View, you can copy from Excel and paste into PEAT’s Custom worksheet as usual, and the equations will carry forward into the Custom Equations will be pasted into the Custom worksheet and be updated/calculated as live links.
- Please note that PEAT Custom worksheet now supports the main basic functions, which are sufficient for most users.
- Uncheck the Auto Calculate box to temporarily turn off auto update before pasting a large model but remember to turn it back on afterward. The Custom tab will paste the model more quickly.
- Be careful with the specific cell locations where you copy and paste. For example, if you copy cells A1:C10 in Excel, make sure to paste into the same cell locations in the Custom tab so that the equations, links, and their computations will be preserved.
- You can Cross Link cells among tabs (i.e., one custom tab has cells linked to another custom tab inside PEAT). In order to cross-link among tabs, you have to use the internal Custom tab naming convention. For example, you can use equations like: =xls2!a3 or =100*xls3!c35 and so forth. This is similar to Excel’s worksheet cross-linking convention.
- If you are copy and pasting a live model with multiple worksheet cross-linking via the CTRL~ approach above, make sure to first rename your Excel worksheets to xls1, xls2, and so forth. This will automatically rename the links inside Excel, and, hence, when you paste the live equations, the Custom tab cross-links will be maintained.
- Another approach is to Link to an External Excel Model. This means the Excel model is kept separate and external from PEAT and will be maintained external to PEAT. These external Excel files can then be linked to PEAT and when the Excel source models are updated, the Custom tab’s values will also be updated. In the Custom worksheet, click the Excel button to Add an Excel Link (or to Edit/Delete existing links). Then Browse the Excel File you need, select the Excel Worksheet and Excel Cell Range to link from, and enter the Starting Cell in the Custom worksheet to link to. Enter a Name and Notes for easy reference in the event you have multiple links (you can link multiple Excel workbook files and Excel worksheets) into one or more Custom worksheets. Be careful with the specific cell locations where you copy and paste. For example, if you copy cells A1:C10 in Excel, make sure to paste into the same cell locations in the Custom tab so that the equations, links, and their computations will be preserved.
- Custom tab’s results and values can also be used to Link From/To another Project tab within the PEAT For instance, the Custom tab is used as a scratch location where your own custom computations are done. And some of these resulting computations need to be used in the Project tabs. You can always copy and paste static values to these Project tabs or create a dynamic updatable link. Multiple links can be performed, where each link can take on multiple cells at once.
- The first step is a Link To. In the Custom worksheet, select the data area (one or more contiguous cells) and right-mouse-click Link To in order to generate a link from this Custom worksheet. Notice the blinking marquee border around a live Linked To data area.
- The second step is a Link From. In the Project tab, select the cells/location you wish to link the data into and right-mouse-click then select Link From. You can also Remove Link later if required. Notice the yellow highlights indicating a live link. Changing the values in the Custom worksheet will change the values here.
- Miscellaneous Tips
- You right-mouse-click to Copy Formula and then right-mouse-click Paste the Formula with Relative versus Absolute cell addressing. This is the same as $ cell addressing in Excel. You can also paste data with Signs Reversed (e.g., expenses with -100 values will be pasted as 100 with signs reversed) or paste their Absolute Values regardless of signs.
- You can also select cells with basic input values via the right-mouse-click and Set as Simulation Assumptions. These cells will turn green and show up later in the Risk Simulation | Set Input Assumptions In the event these set assumption cells in the Custom tabs do not show up, save the file and reopen to reestablish their internal links.
- Change cell colors or font colors by using the color droplist icons.
- Use the Up/Down/Left/Right arrows on the keyboard to navigate the data grid.
- Use F2 or double-click on a cell to access the contents of the cell for editing.
- Click on the top left corner of the data grid to select all cells at once.
- You can increase/decrease the column width as required (simply drag the column to change its width or use the Grid… button to Auto-fit columns).
- You can click on and select multiple rows or columns at once.
- Do not change the source Excel file name or folder location if you are performing a live link from Excel.
- By default, the Live Links from source Excel files are updated every time the *.rovprojecon file opens (this checkbox is default selected when you click on the Excel button in the Custom worksheet).
- Live Excel links when updating and will locate the same file name in the absolute folder path (e.g., c:\your folder\subfolder name\filename.xlsx) first. If the file does not exist, it will locate the same file name in the relative folder path where your *.rovprojecon file is stored. The latter comes in handy when you have to e-mail the model file as well as the Excel source file to another individual, who may save the files in a different subdirectory/location/path but as long as both files reside in the same subfolder, the links will still update and work.
- The best way to update any externally linked Excel files is to SAVE and restart the *rovprojecon file.
- Manually inputted cells (black font) can be overridden easily by simply typing over the cell’s values (type over the cell, double-click, or F2 to access and edit the cell). Linked cells (blue font) are intentionally created to prevent accidental overrides (you cannot simply type over existing cell values) and you can only intentionally override Excel linked cells by selecting the cell and editing its contents in the Formula bar.
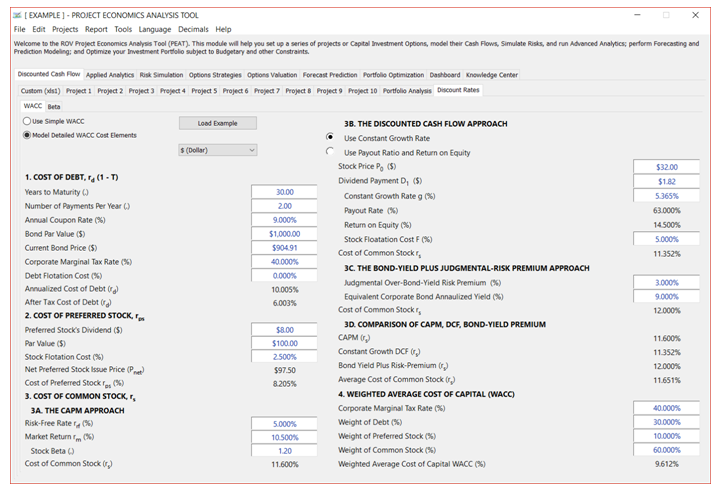
Figure 9.1 – WACC Discount Rate
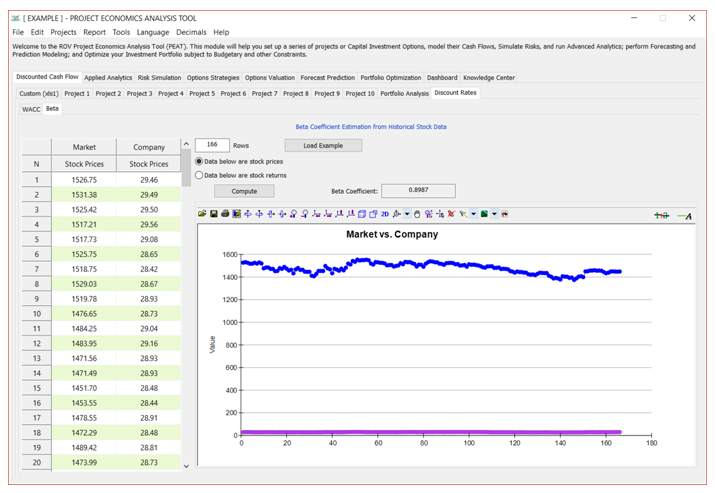
Figure 9.2 – Beta Risk Coefficient
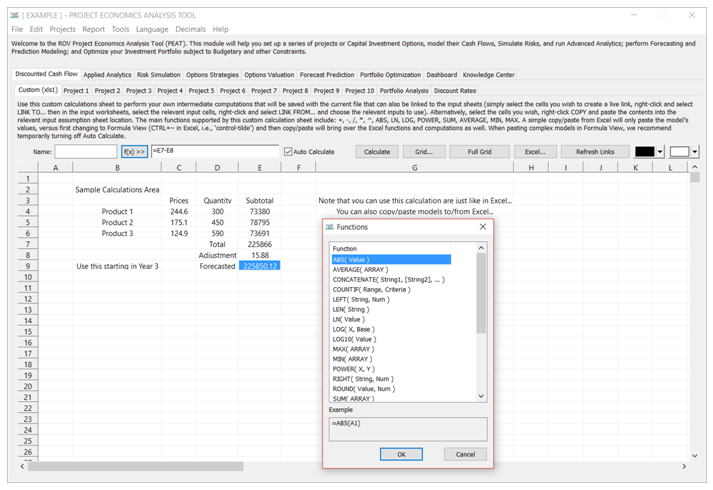
Figure 9.3 – Custom Calculations